We’ve just taken on a massive project in the house. It looks like we’ve just chucked up some cupboards, but I can tell you now it’s not like that at all! This has taken a couple of weeks of planning, measuring and ordering items before we even started! Then, it took 10 full days to build and finish this DIY built-in desk. So be prepared, this is a big DIY project to take on.
We’ve never tried building cupboards from scratch; we’ve created a few built-in items, but we usually use IKEA units and then modify them to fit our space. But I loved the look of a properly built-in desk area at the dining room end of the house. When we designed the extension we always had in mind a desk area for me to sit at, so making sure we have room to fit this in, I had a lovely oak desk that I planned my sockets around and loved being near the garden, and in the summer, having the doors all opened whilst I was sat at my desk.
However, storage was always an issue; I had two cupboards, one that fit the computer unit, and the other had filing drawers. There wasn’t anywhere to put the printer, paper, and photography things. This area became so cluttered and was always an unorganised dumping ground. Then throw into the mix all the craft stuff that I and the girls love to do, it looked a mess!
We have created this post for individuals who enjoy taking on a project themselves. You will need a good understanding of DIY skills to make this from scratch. If this isn’t something you’re ready to take on yourself, consider hiring a fitted desk companyto help you create this look.
Before The DIY Built In Desk
This was how the dining area looked before we had the extension, with our dining table, desk, and TV area all in this space. It was always cluttered, snug for five people, and not very nice to look at.
Having the extension out to the opposite side allowed us to have a large kitchen and dining room area, spreading out the furniture and creating a much nicer family room.
The desk was located at the far end, and this was the original wall we had, on which we planned to build the DIY built-in desk and fill this space.
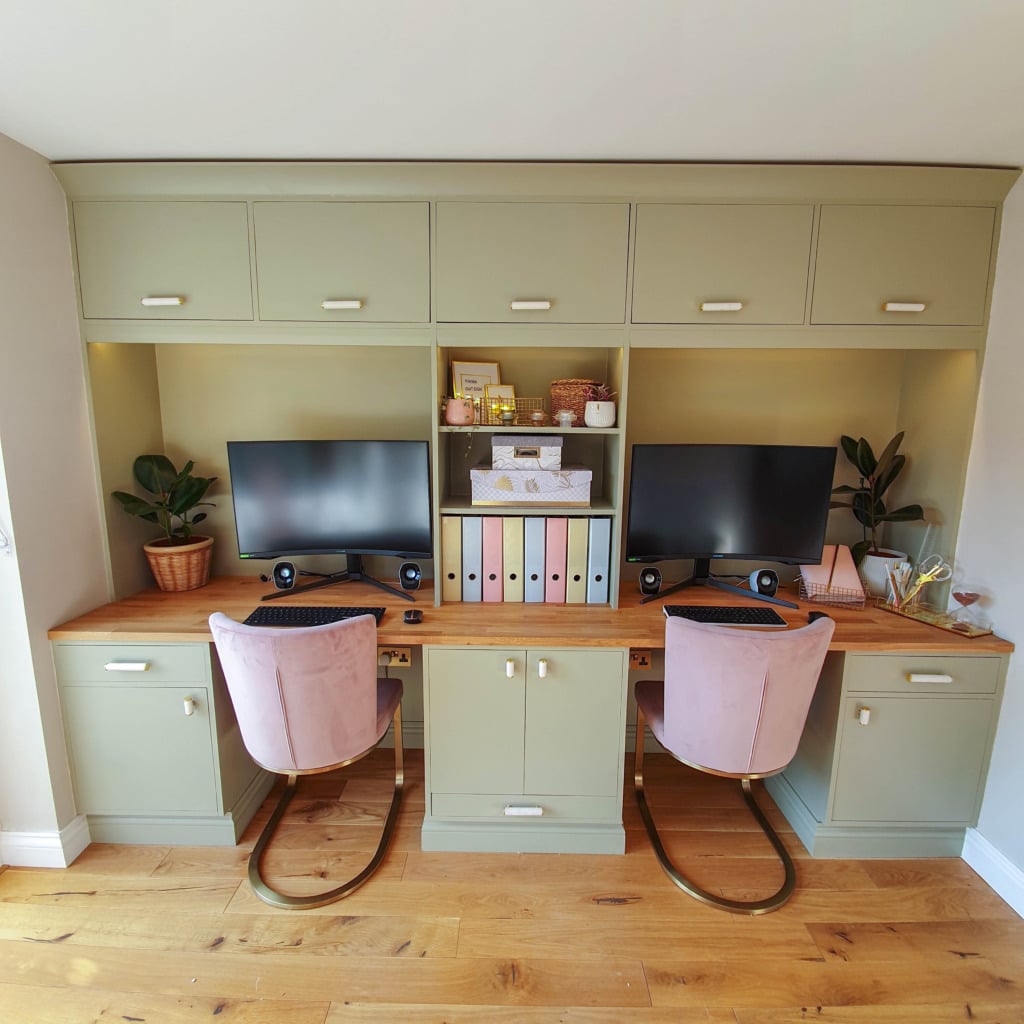
It’s a large wall that measured 3 metres long, so perfect for two desk areas, so why not make the most of the wall space and as the wall wasn’t being used for anything else we could create two desk areas with storage up the middle and across the top.
Making the unit fill the full length creates this fully built-in desk area that is made to fit perfectly. It just meant a lot of planning for us and making the units from scratch!
Final Look Of Our DIY Built Desk
We are delighted with it, and it’s a brilliant working space for both my husband and me, as he can now join me rather than being in the other room on his laptop.
So over a few posts, we will share how we made this, from creating the MDF cupboards, drawers, and units, but for now, I will give you a run-through of how we created this.
Video Run Through Of Our DIY Built In Desk
We Used MDF
Using MDF requires planning and extensive preparation, but it is significantly cheaper than plywood or real wood. We purchased the largest sheets we could from B&Q measuring 2.44 metres x 1.22 metres x 18mm £25.97 per sheet but these are super heavy at 33kg each sheet and awkward to move around. But if we had gone for the next-sized down sheets, we would have had to pay £150+ extra for the same amount of MDF used.
Ryobi Circular Saw
To make life easier, we purchased a Ryobi circular saw and some sawhorses; both of these have proven invaluable and will be used for many more projects as well.
Just be prepared, if you cannot attach the vacuum to the end of it, you end up looking like this!!!
Kreg Pocket Hole Jig
Kev also invested in a Kreg pocket hole jig, which allowed him to connect two pieces of wood together easily and securely. It hides all the screws, so visually the cupboards he makes are all hidden from screws!
Made The Base Units
We made the base units first, two cupboards with top drawers and a middle unit, which will house the printer in between.
Made The Drawers
I think making the cupboards was super clever, but to add drawers to these as well is fantastic.
Printer Pull Out Drawer
We have a large laser printer that has a top that needs lifting up to change cartridges and remove jams, it’s pretty heavy so I didn’t want to lift out the printer when this happens. So we made a cupboard with a pull-out drawer.
I love this feature! It’s great to be able to hide the printer away and have a sturdy drawer that pulls out to gain easy access to it, without having to squeeze into the cupboard to reach it.
Sand and Prime!
This stage took ages! Everything needs to be sanded down thoroughly before priming. The edges of MDF are rough, so these need to be sanded down first. Then you need to add some slightly watered-down PVA glue to all the edges, which creates a seal. Then, once the light sand is dry, you can start priming everything. We used the Leyland acrylic primer undercoat for wood and plaster.
You need to apply two coats of primer, sanding in between each coat. You will see the edges getting smoother and smoother.
Painting Time With Colour
Now you can start painting in some colour. I used the Decorating Centre Online to colour match the paint that we loved. I picked Farrow and Ball French Gray and they colour matched using the Leyland Hardwearing Eggshell paint.
We chose this paint because I wanted to create a hard-working surface that could withstand a few knocks. Additionally, the soft sheen creates a different look compared to the standard emulsion on the walls. I was very pleased with the service from this company, and being able to colour match Farrow and Ball was great!
We painted all the units, door fronts, and the back wall. I thought I didn’t need to paint all the way up, as the units were already there, but then that meant the back of the top units were also painted. I also was worried about how far my paint would go, but I reckon 2 coats on everything wasn’t even half this 5L tin.
Handles
Ensure you secure the handles on the lower drawers and cupboards before installing the worktop; otherwise, you won’t be able to open your new doors and drawers.
We found some lovely handles from Knobbles and Bobbles that pull in the white from the table and worktops, and the gold from the rest of the room. The quality was pretty good; a few of them were a little wonky, but you don’t notice once they’re installed. Much cheaper than many places, too, and this website.
We have solid wood flooring throughout our kitchen and dining room, so we wanted to incorporate it into our DIY built-in desk. Worktop Express sells a 3-metre solid oak worktop, which was perfect for our space. They offer it in various lengths, widths, and depths. With speedy delivery, we couldn’t fault them at all.
We purchased an unfinished solid oak worktop 3 metres x 620mm x 27mm. We picked unfinished as we could use the same Osmo oil as the flooring to create a similar finish and colour.
It was starting to come together once the worktop was on, but we didn’t stop there, did we!
Shelving and High Storage
By filling in the gap between the two desk areas, we can add shelving to have pretty items on the top shelf, and then I have created an admin area with folders and boxes to contain items within.
Once this has all been built, you need to go through the sanding, priming and painting process again! This stage took even longer, as there was so much more to paint than the first section.
Caulking and Filling
An extensive process of making the units look like they’re built-in and made to fit involves filling and caulking every gap. Go around all the units, shelves, and against the walls and skirting before you paint and caulk every gap. Once smoothed out and painted, you won’t see those gaps, and it looks so much neater.
We used the Ronseal wood filler to fill in any screw heads, gaps in the wood and any area where the Kreg pocket hole jig was used and can be seen.
Oiling Worktop After Painting
We oiled the worktop after all the painting was done, in case any paint got on it.
Storage!
Look at the insides of this DIY built-in desk! There is so much room, and I am super pleased with it all. The printer has a perfect cupboard, computer cupboards anda desk for all those little bits and bobs.
Skirting Boards and Edging
You may have also noticed the skirting boards got added along the bottom of the units, as soon as these went on it just looked so much more like a built-in desk and made to fit this space. We had them running around the full width, around the inside sides and along the wall. Painted in the same colour as the unit, they blended in.
We also added a cornice along the top edge, which matches the style of the kitchen units we have, and then a pelmet along with the bottom units, which again matches the kitchen units at the other end of the room.
This was also perfect for hiding the smart lighting we installed!
Smart Lighting
We love Philips Hue smart lighting and have them in various places in the house. So instead of having desk lighting on the desktops, we ran the Philips Hue Lightstrip underneath the top cupboards. This shines light down onto the keyboards but also creates a beautiful look against the back of the units.
You will need the 2-metre pack with the plug and then an additional 1-metre extension section, as you can connect them together to create a longer length.
Also, this end of the dining room was always dark and gloomy, but now we can have it all in different colours if we want! Functional lighting, but also very aesthetically pleasing to the eyes.
Feature Wall
I really love how this DIY built-in desk makes a proper feature of the end of the room. It had always been such a bland wall, and I didn’t know quite what to do with it. Now I have this beautiful DIY built-in desk for two of us to sit at, and it actually makes the room feel bigger.
I have plenty of cupboards to hide things away, because, as much as you can keep clutter to a minimum, we are a family of five and have a lot of stuff!
I love nothing more than being organised, it makes me feel calmer and more in control of things. I know where things are when I need to find them, and it really clears my mind.
Adding this row of A4 ring binder folders has allowed me to store a wide range of items, as I’ve added pocket folders inside that clip closed. So, not just paper pockets that only hold the paper.
Pretty Shelving
We picked the top shelf to add some pretty items to soften the look of the built-in desk and add some colour to the area, too.
A string of heart plants in the pink pot will grow and hang down over the shelves from Stupidegginteriors
A Nanouk plant in the white pot to add a shot of colour from Stupidegginteriors
Baskets that I have filled with tealights, to go with the three colour glass tealights from H&M Home
Metal gold baskets that I can use to add anything I want to from H&M Home
Gold frames with custom made gold foil prints that I made From Amazon- Small and Medium
Desk Organisation
I love having things to hand and knowing just where they are, and even better when they look pretty! I loved this gold acrylic desk organiser that I will fill up! However, they currently have some beautiful gold scissors, a ruler, and my colourful pens, which make staying organised in my diary and bullet journal much more enjoyable. My little sand timer is for me to keep track of how long I’m sitting at my desk, getting up every 30 minutes to move around.
I also added these great drawer organising containers, as they keep everything in place and contained, ensuring my drawer stays tidier.
Overall Look
Building a custom desk with integrated storage is a great way to make the most of your space while keeping everything neatly organised. Whether it’s craft supplies, children’s toys, seasonal decorations, or everyday household items, having the proper storage solutions ensures a clutter-free home. However, even with built-in shelving, some items may still occupy valuable space, making it more challenging to maintain a tidy environment. If you’re running out of room for less frequently used belongings, using a secure and affordable self-storage unit can be an innovative solution. Long-term storage options allow you to declutter without sacrificing accessibility, giving you a streamlined and stress-free living space.”
We are over the moon with our new desk area, we’ve surprised ourselves on pulling it off and it looks even nicer than we thought it would do! I hope you like it too, like I said we will put together some posts on how to build it and more detailed information.
This is amazing! We’re hoping to buy a house this year and I will definitely be needing office space. If we can create anything half as good as this I’ll be thrilled!
I love how you have made it such a lovely space to work. You’ve managed to add the storage and keep it looking beautiful which can be hard to balance. I definitely feel I need a plant on my desk having seen yours too!
I love everything about this! The colours look so stylish together and it all matches the room so well. The desk is big and lots of storage space, you have done a wonderful job!
It looks so aesthetically pleasing! Here we stay at a rented flat, so ordered everything from IKEA but if I buy home in future, will implement your idea Love your at-home desk area, great job
This website uses cookies to improve your experience while you navigate through the website. Out of these, the cookies that are categorized as necessary are stored on your browser as they are essential for the working of basic functionalities of the website. We also use third-party cookies that help us analyze and understand how you use this website. These cookies will be stored in your browser only with your consent. You also have the option to opt-out of these cookies. But opting out of some of these cookies may affect your browsing experience.
Necessary cookies are absolutely essential for the website to function properly. This category only includes cookies that ensures basic functionalities and security features of the website. These cookies do not store any personal information.
Any cookies that may not be particularly necessary for the website to function and is used specifically to collect user personal data via analytics, ads, other embedded contents are termed as non-necessary cookies. It is mandatory to procure user consent prior to running these cookies on your website.


![Philips Hue White and Colour Ambiance LED Smart Lightstrip [2 m + 1 m Extension], with Bluetooth, Works with Alexa, Google Assistant and Apple Homekit, One Colour](https://m.media-amazon.com/images/I/41tlKkLsuVL._SL75_.jpg "Philips Hue White and Colour Ambiance LED Smart Lightstrip [2 m + 1 m Extension], with Bluetooth, Works with Alexa, Google Assistant and Apple Homekit, One Colour")


")
")


28 Comments
This is amazing! We’re hoping to buy a house this year and I will definitely be needing office space. If we can create anything half as good as this I’ll be thrilled!
Ah that’s very kind, thank you very much. It’s a great space for us now
I love this so much and definitly need something like this in my home!
Perfect space now isn’t it for working at, everything in one place!
Oh wow, this came out so lovely! Looks like it was built perfectly.
Ah thank you very much, I love this space now.
I loved watching this come together on your instastories, it’s just so amazing!
Thank you very much, it was a fun project!
I love the colours. My son and daughter in law are both working from home at the moment and would love something like this.
Yes it’s a brilliant space for us love using it
Wow, what an amazing project, you’ve done a really great job!
Thank you very much, I’m over the moon with it
What a build. It looks great abs I lobe the organisation ideas.
Thank you, need all the storage we can get!
WOW wee this looks amazing. Love the office desk space and the nifty draw with all the storage for stationary too x
THank you, it’s going to get used so much!
That looks amazing, don’t suppose he wants to build me one too 😉
I think he has a list building of people wanting one now!! I have too many other projects for him though!!!!
This looks great! I love the colour of the units. I bet its made a big difference to how your work.
I love everything having a place and this achieves that, so it makes me concentrate more!
I love how you have made it such a lovely space to work. You’ve managed to add the storage and keep it looking beautiful which can be hard to balance. I definitely feel I need a plant on my desk having seen yours too!
Haha got to get a plant in there somewhere! Thank you very much, it’s a nice place to work for us and hide everything too!
I love everything about this! The colours look so stylish together and it all matches the room so well. The desk is big and lots of storage space, you have done a wonderful job!
Thank you very much, I’m super pleased with it. Such a great space to work at
I am so jealous of this work space. It’s so beautiful and amazing how you created something that works for you.
It was nice being able to design it so it worked for us, had to make it beautiful too! Thank you very much
It looks so aesthetically pleasing! Here we stay at a rented flat, so ordered everything from IKEA but if I buy home in future, will implement your idea Love your at-home desk area, great job
IKEA is great for furniture, really quick and easy to build and can take it with you can’t you!